
DETAILED PROGRESS
July 18th, 2019
Group
We worked on the final report and make sure to check there were no grammatical and spelling errors. We also updated the website to include the new updated block diagram, design report and all testing results. We started working on the PowerPoint presentation and began discussing on who would be talking about different slides. Once we figured out who would be doing certain slides, we began practicing and timing ourselves and perfecting our presentation.
July 15th, 2019
Iqbal
Modified Facial Recognition Software to make sure that no stranger was detected.
Group
As a group we worked on the draft for the final report and started quantifying the data that would be going in the report. We also did more tests on Charlie, Iqbal's roommate and the stranger for all tests, to make sure we were getting good results.
July 14th, 2019
Iqbal
Iqbal began compiling all the tests that he had done previous to Catalina coming over to do more testing.
Group
The final assembly was complete. All the housing components were done. As a group, we tested all the possible scenarios and combinations. Iqbal and Catalina were the main test subject but there was a stranger in which we needed to test and see if the door would unlock for an unknown face. All the testing results on their own tab.


July 8th, 2019
Iqbal
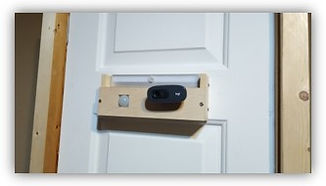
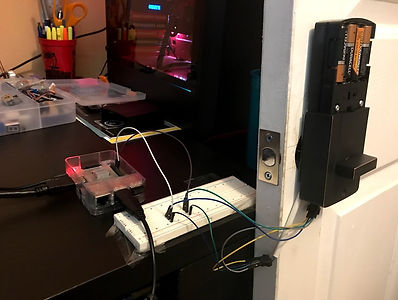
Iqbal placed the Front Face Housing and Raspberry Pi Housing on door. Iqbal also connected the Raspberry Pi to the electronic deadbolt which was also placed on the door.
Group
We placed the New Camera and Raspberry Pi Housing, made out of wood instead of plastic, into the door with the electronic deadbolt functioning. We began early testing of the locking and unlocking as this is the first time everything is connected on the door and working. We had to modify the speed and time that the motor was working as some times it would get stuck on the door frame.

July 6th, 2019
Iqbal
Iqbal modified the Facial Recognition software with more pictures of Catalina and himself. He also added wire covering to the wires coming from the electronic deadbolt into the Raspberry Pi. He did this to all the wires that were connected to the limit switches and the wires from the motor.
Catalina
Catalina installed the motion sensor light, PIR Motion Sensor and Pi camera onto the back of the Front Face Housing.
Group
Once Catalina was done installing all components on the Front Face housing, we made a small hole underneath the Pi Camera so that the connections from PIR motion sensor and camera would through the door and onto the Raspberry Pi on the backside of the door.

July 1st, 2019
Iqbal
Iqbal finalized the Raspberry Pi Housing and sent to Catalina to print.
Catalina
Catalina picked up the Raspberry Pi Housing from the Open Lab and double sided tape to mount the housing on the door.
Group
Together we placed the camera, motion sensor, and Raspberry Pi onto their respective housing and placed on door. We came to an issue when the locking mechanism would not turn and will work on it next time we meet.

June 29th, 2019
Iqbal
Iqbal started placing the components in the 3D printed enclosure. The holes for the Raspberry Pi had to be re-drilled because the openings were not large enough. The bracket cover on the internal deadbolt enclosure was also very limiting to the wires that were added. This bracket was ground on each side to accommodate the wires for the switches. An opening was also cut to see the position of the internal gears.
Group
We added another hole to the Pi enclosure to accommodate some wires. It was clear that the enclosure would need to be reprinted since it was very difficult the get the Pi, along with the wires into the enclosure.
Along with setting up the Pi, we were able to test the code for the PIR motion sensor. Once the motion sensor was triggered, a live video feed would start and the Raspberry Pi facial recognition portion of the software would be initialized.
Group
June 27th, 2019
Together we met at Catalina's place and developed the code required for the push buttons. Using 4 push buttons and one encoder the sample code for four numbers on the number pad was developed and tested. The Raspberry Pi read the input through the GPIO correctly. We also discussed ways of incorporating the push buttons into the enclosure.
June 25th, 2019
Iqbal
Iqbal soldered three of the limit switches. We decided to use the NC(normally closed) pin of each switch. Each switch was tested on the Raspberry Pi and confirmed working simultaneously. The switches were wired into the locking mechanism housing and the gears were placed back into the housing. This took some time because the space in the housing is very limited.
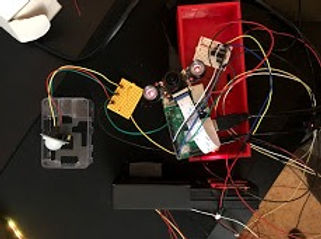
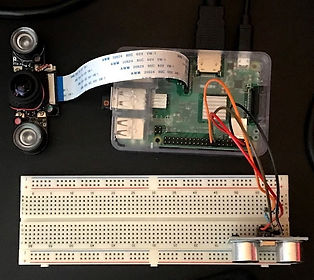
Group
When Catalina arrived we wired everything for the switches and the motor of the deadbolt to the Raspberry Pi. This setup is shown below. We started testing the motor with the switches and after trail and error runs to determine how the code for the switches should be integrated we started having issues with the motor. It randomly stopped, so we had to start troubleshooting this issue.

June 24th, 2019
Group
Iqbal started the design for Raspberry Pi Housing and when Catalina arrived we completed the design for both the Raspberry Pi Housing and the External Housing Lid on Fusion 360. We got this completed that night so that Catalina could get the files to the Open Lab the next day for printing. Below the Fusion 360 design of the External Housing and Pi Housing is shown. In addition we also started soldering the new switches.


June 22nd, 2019
Catalina
Catalina started the design of the External Housing on Fusion 360. It has to hold the Pi Camera and the motion sensor. Both units must have access to the outside of the housing, while being secured to the inside of the unit.
Group
We were able to remove the snap ring clip holding the locking mechanism gears in place. We were also able to remove the switches, although one was broken during removal because of the glue holding it in place. We tested these switches with the Raspberry Pi, but didn't get any feedback. It was difficult to determine the wiring on each switch because of the glue covering the pins. We decided to order new limit switches.
In addition to the limit switches, we also finished the design for the External Housing and Catalina got it to the Open Lab for printing the next day. Lastly we edited the report with the comments that were emailed to us from Dr. Ejaz.
June 18th, 2019
Iqbal
Iqbal was finally able to get the recognition portion of the software working. So both the training portion and the recognition portion were working, but needed testing and modification. At first the live feed would falsely recognize me as Catalina. The confidence level required was increased and it was still recognizing Iqbal as Catalina, although sporadically.
Group
Once Catalina arrived, Iqbal decided to retrain the program with current images of them. About 15 images of Iqbal and 25 images of Catalina were stored and used within the training algorithm. After testing and modifying the confidence level of the recognizer, we were able to get steady results. The program was consistently recognizing both of us within a live feed.

June 15th, 2019
Iqbal
Iqbal started developing the code for the recognition portion of the final operating program. He had to combine the algorithm portion from earlier with a function to recognize the correct person from the picture read into the program. After some research, an open CV built in recognition function was found.
Catalina
Catalina conducted research on how to use and wire the limit switches of the locking mechanism. She also did research on what encoders to use for the number pad and concluded that it would be best to use two 8 to 3 encoders.
June 11th, 2019
Iqbal
Iqbal finished the code for the Eigen Faces algorithm, the algorithm was able to generate the mean faces using roughly 10 up close facial pics from Catalina. The next step is the recognition portion of the code. Using the mean Eigen faces, we should be able to recognize a face with a picture on it with a certain level of confidence.
June 9th, 2019
Iqbal
Iqbal continued to research and work on the EigenFaces algorithm. He reviewed a previous report on using EigenFaces within Matlab given by Dr. Ejaz.
Catalina
Catalina worked on the wiring of the DC motor and followed the instructions from the website "Controlling DC Motors Using Python with a Raspberry Pi"[4]. She then used the sample python code found on the site to control the direction of the motor.
Group
Together, we connected and tested a DC motor through the GPIO of the Raspberry Pi. It used three GPIO pins and 6 volts source from four AA batteries in series. A video is shown below of the first test with a small generic DC motor from an Arduino kit. Afterward we removed the DC motor from the TL-201 deadbolt and tested it with the program. It operated in the same manner, so we adjusted the speed so that the motor could work within the TL-201 deadbolt. A video of this test is shown on the bottom right.
June 3rd, 2019
Iqbal
The structure of the website was modified; Iqbal added a main menu for 'SENIOR DESIGN' and placed all related links under this main drop down menu. 'DESIGN IDEAS' was split into 'PROPOSAL IDEAS' and 'FUTURE ADDITIONS' and each link was placed into 'SENIOR PROPOSAL' and 'SENIOR DESIGN' respectively. This makes the website easier to navigate because all work for the proposal and design are separated.
In addition, Iqbal continued Haar Cascades Facial Recognition training with Catalina's pictures. The negatives were created and using one positive image and opencv_createsamples function, samples of the positive image were created. When using the opencv_traincascades function, a 'Bad Arguement' Error was given.
Catalina
Catalina added links to the 'SENIOR PROPOSAL' and 'SENIOR DESIGN' menu pages. In addition she started adding more details to the 'DETAILED PROGRESS' portion of the site.
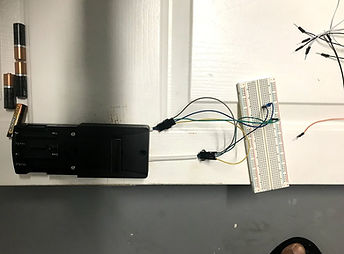
Catalina then wired the data wires from the the TL-201 deadbolt into GPIO pin number 12 and 16. She also took apart the deadbolt and began investigating the deadbolt. Able to see how the deadbolt works with the motor and limit switches. The deadbolt uses serial communication to send the signals to unlock/lock the door. In order to achieve the interception, we have to investigate if this is possible and if not look for other options to unlock the door. Catalina's security advisor proposed other options: either a door strike or a magnetic door lock.
Group
As a group we wrote the python program in Thonny to read any high signals coming from the data wires when the TL-201 deadbolt was locked and unlocked using the pinpad. The setup is shown below.
May 28th, 2019
We began testing raspberry pi with power bank and see how much power consumption it takes and researched the GPIO data input read methods in the Raspberry Pi as we wanted to use that get the deadlock signals and see how it works.
We set up and tested the TL-201 Deadbolt with wires and LEDs to see if we could see the signals being sent to unlock the door. Unfortunately the lights we're flashing extremely fast and couldn't be seen too much.
May 27th, 2019
Iqbal researched more ways that haar cascades deep learning algorithm works and started modifying the simple algorithm to be more complex.
Catalina completed the installation of the TL-201 Deadbolt to test how it works without modification. This was done to understand how the deadbolt works and how the backup system will work for the project. It helped us understand how the keypad works and how someone would have to use it in order to get into a house.
As a group we started building the haar cascades for Catalina's face.
May 21st, 2019
Iqbal ordered the solar powerbank and began raspberry pi power consumption. He also modified the opening for the deadbolt as it wasn't the right size.
Catalina began researching how to read and intercept deadbolt signal to work with the Raspberry Pi. She also updated website with up-to date data tables, added the time and effort table as well as the tentative project timeline next to the time and effort table.
May 20th, 2019
We assembled and implemented a proximity sensor to the raspberry Pi. We decided to do this as we were concerned about the power consumption of the Raspberry Pi. We have started writing a program in which the proximity sensor will always be on and once it detects a movement, it will turn on the Pi camera and started detecting faces..

May 19th, 2019
Iqbal
Iqbal made the hole for the Turbolock Deadbolt and then as a group we began installing the Deadbolt onto door. We began testing the simple function of the lock and see how the keypad functions and how it would look with the wires attached to it.


May 14th, 2019
Continued testing the simple facial recognition software that was found before and realized it was only detecting Catalina's face only and not Iqbal's. We also began researching on how to make our own haar cascades in which we would implement the facial recognition to learn our faces.
May 13th, 2019
We downloaded the OpenCV that was found before and tested it on the Raspberry Pi and Pi Camera. We began testing the simple of facial recognition program.
May 12th, 2019
Begin reviewing OpenCV haar cascades. We found some haar cascades that would detect a face and eyes. Once it detected a face and eyes, it would build a rectangle around the face and circles for the eyes.
May 7th, 2019
Group
We also began testing basic facial recognition software that we found online to make sure the Pi camera was compatible. We started testing simple haar cascades found online. Haar cascades is a deep learning algorithm in which it is able to identify objects in an image of video. Our objective is to make the Pi camera to take multiple pictures and detect the image that we want.

May 1st, 2019
Group
Together we flashed and installed the Linux OS, Raspian, onto a 64 GB Sandisk micro SD card. Then we connected the pi camera to the Raspberry Pi and began testing the camera features by taking pictures and videos. Using a YouTube tutorial we were able to capture both pictures and videos from the terminal window. This was our initial step to determine the if the resolution of the pictures and videos were adequate for racial recognition.

April 17th, 2019
Iqbal ordered the two main parts, the Raspberry Pi 3 B+ and the MakerFocus Camera through Amazon.
April 24th, 2019
On the 24th of April, Iqbal ordered the TL-201 deadbolt and Catalina started research on using the Haar Cascades algorithm. She found the in depth tutorials from the user sentdex on YouTube on training Haar Cascades to recognize the desired object.

